Background
I have always wanted to build another gasser, this time a nice one and not the POS Henry J that was unsafe at any speed and didn’t last even one run before the rear end exploded.
I and a few high school shop friends had built that car in a driveway with a gas welder, my mother’s vacuum cleaner with a spray paint accessory (made to spray pesticides). The driveline was from a Hudson and was a tight fit, we should have included the rear end but instead we welded the driveshaft to make it work. Tech inspection of the day allowed us to get in line one Sunday at the nearby track that was a converted WWII airstrip.
One run and done on the starting line was the result but a lot of fun and experience was gained along the way.
The Vision
While living in the Tampa FL area I was looking for a candidate in the early 2000’s, something old school that would not need a lot of body work, something that would have the look and function that a late 1960’s home built gasser would have had in the day.
The Car
I found a good candidate and was able to acquire the 1937 Ford 5 window coupe project donor from a private owner who was having it built at a shop as a street rod project. The project had stalled out when the dot.com boom busted and the cash need to complete the project had dried up.
The project included a very rust free and dent free body, a TCI chassis with a four link coil over rear suspension, ford 8.8 rear end, a Mustang II front end with tubular A arms and a 5.4 Cobra mod engine and AOD transmission along with a pile of other parts and pieces.

KONICA MINOLTA DIGITAL CAMERA
My plan for the car was always to build a period correct gasser as it would have been done in the late 60’s in the style it would have been built during the NHRA period of gassers, altereds and slingshot rail jobs.
Some concessions to time would be needed if I planned to ever actually race the car on today’s tracks but most of them would be for safety issues that would not distract from the appearance of the finished product.
The Parts
A 1960’s period correct gasser would require collecting period correct pieces including a complete new drive train, front and rear suspension, tires and wheels, interior pieces and attention to details such as ladder bars, fender-well headers, tilt front end, a mooneyes front mounted tank and ladder bars to complete the look and function of a mid 1960’s gasser
The Drive Train
The first task was to locate a period correct drive train that the rest of the needed pieces would be built around. Most of the high end gassers of the time were running blown hemi’s at the top end of the competitive scale but I envisioned a more typical home built gasser that would have been what a local competitor at a local track would have built.
My choice was a 425 ci Buick nailhead because it would be a little bit contrary to the small block Chevy that would have been the most readily available engine for a small budget engine of the day.
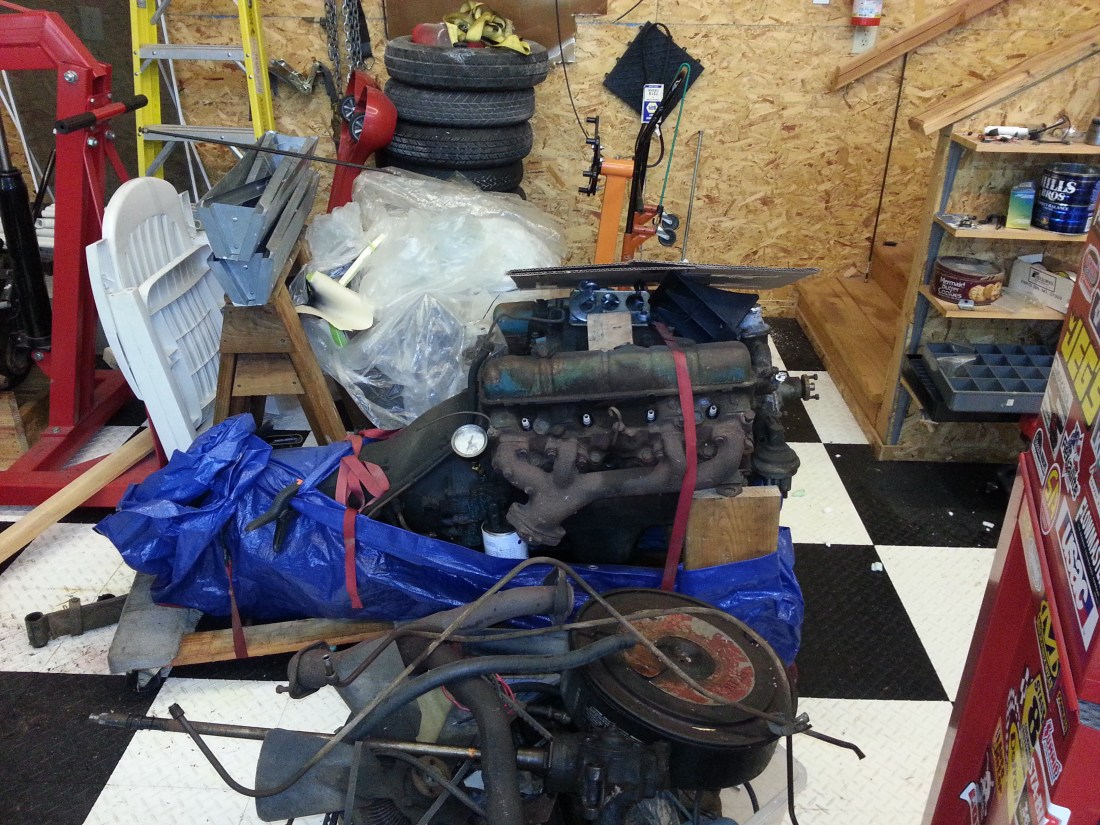
I was able to locate a running 425 cu in Nailhead in a 1966 Buick Electra 225 with a TH400 switch pitch transmission while working in St. Louis and I purchased the entire car and shipped it back to Vancouver WA.

KONICA MINOLTA DIGITAL CAMERA

KONICA MINOLTA DIGITAL CAMERA

KONICA MINOLTA DIGITAL CAMERA
I pulled the engine and trans together along with the driveshaft and transmission cross-member and other small pieces that I thought might be useful and scrapped the rest at a yard that was nearby and watched it ascend the conveyor belt to the crusher and grinder and come out the other end as small pieces of metal on their way to China, RIP faithful friend.
The engine will look great with long injection stacks, hilborn barrels and I will convert them to efi and hide the evidence to keep that old school look.
The Suspension
The front axle and suspension was next and again I sought out something unusual because the supply of Econoline and Dodge D100 vans was small and most had been picked over already. I was able to locate a complete 1967 Chevy van and negotiated a good deal on the complete front end suspension including steering gear and column. I had to remove it all myself in a muddy field in the rain but he did lend me a pickle fork and it was a complete system.
I removed the Mustang II front end as a unit but left it intact on the frame by cutting the entire front frame off in front of the firewall and leaving enough to make a strong connection to the new front frame when the time came. I sold the entire front end on ebay, put it on a pallet and shipped it freight to the buyer for his street rod project.
The rear end was another component that needed to be the right piece for the time and the 9.3 in Olds/Ponticas of the 1960’s we often used because of their availability and strength.
A 9” ford would be used today but this is the 1960’s and that unit was not yet the rear of choice in the great gasser wars of the day. I found a 1960 Oldsmobile with a complete rear end in Vancouver WA and added it to the pile-o-parts that I was building. I did not get the rear springs or shocks with the rear but I did find a 1965 Plymouth leaf spring pair in Phoenix AZ that had been prepared for a FX clone car but not used, the leaf pack had been disassembled, glass bead blasted and powder coated and it was only $50 and will only need hangers and shackles to work.
The hunt for a Econoline or Dodge D100 front seat goes on and I will be purchasing new Radir Tri Bar wheels and white wall slicks that I will need in order to plan the narrowing of the read end along with a new ring/pinion set, posi unit and axles to complete the rear along with home built ladder bars that I will make using ¾” rectangular stock and speedway front and rear mounts and axle attachment parts. I hope that the rear tires will fit in the rear fender but if not I will purchase a fiberglass pair and cut the radius out of them so that the pristine original steel rear fenders remain available for someone who might be restoring or street rodding a 37.
The Plan
In order to make sure I would be happy with the results of the completed project I built a complete 1/25 scale model with the correct styling cues, stance and paint scheme that I planned to use in the final assembly after all the rough-in construction is completed and it spends a little time in its rough state on the street to shake down the drive-train, suspension, steering and any redesign or tweaking that is needed before the tear down and final assembly with interior panels, paint, lettering etc.
As a former project manager and engineer I couldn’t resist making a complete project plan and budget tracking spreadsheet with enough detail and order to make tracking and accounting easier.
The Start
After moving the entire project from Tampa to Vancouver and then to Phoenix and the passage of almost 20 years I am finally ready to build the beast.
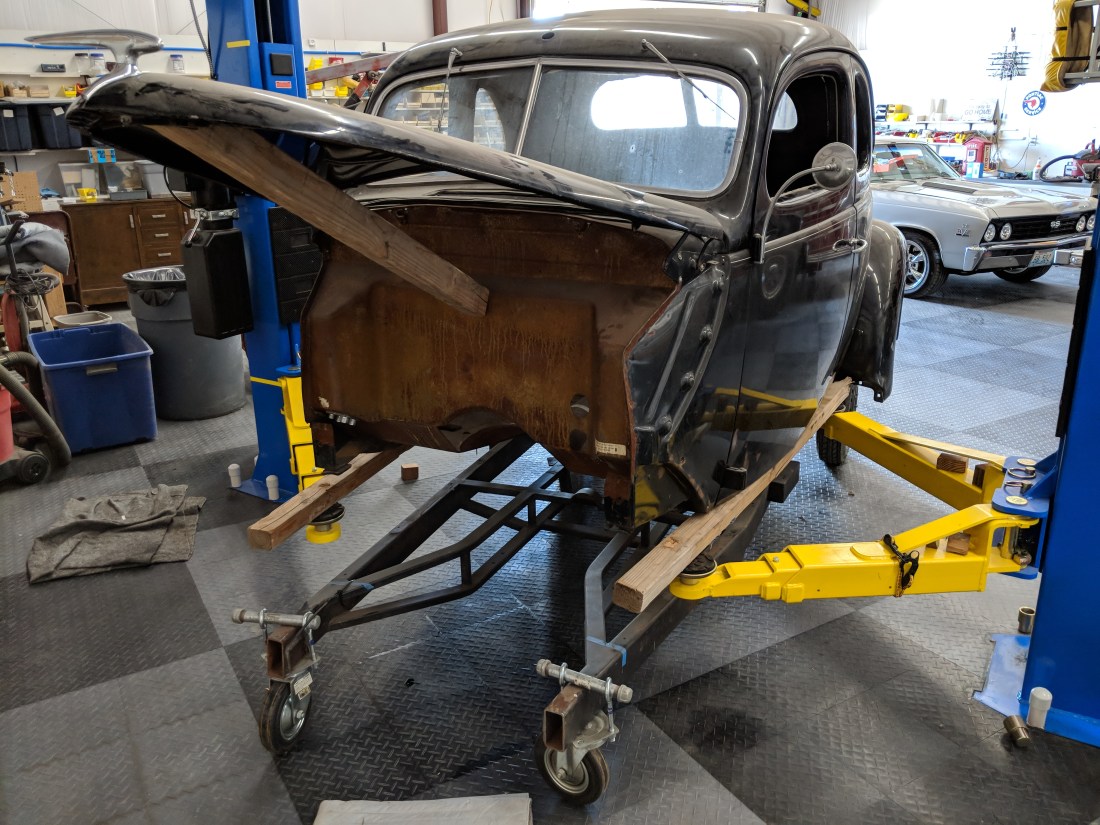
The first step needed was to separate the body from the frame so that I can remove (and sell on Craigslist) the existing rear end and 4 link suspension and begin construction of the rolling chassis including drive train and front end while test fitting the body along the way to avoid as much rework as I can along the way.
I used my shop two post lift to raise the body, roll out the frame with the rear end and built a body dolly to move the body out of the way of the lift while working on the chassis outside.